I hope this finds you a little better acquainted with your colored pencils and getting accustomed with how they perform. This lesson is as exciting as the last, but just a necessary. This week we will go over holding your pencil and common colored pencil strokes.
Holding Your Pencil
The way you hold your pencil affects the way write, so it would be safe to assume that it will affect the way you draw. I don’t think there is any right or wrong way to hold your pencil, but changing the grip changes the style of your art.
No matter what grip you choose, I do find that holding your pencil in relaxed manner will help your avoid sore hands and wrists.
Below is a few ways to hold your pencil:


1.) Overhand grip: With this position, you are gripping the pencil with the forefinger and thumb while the pencil is resting on your middle finger. The pencil point is on its side as it strikes the paper. The strokes are made with the motion of the wrist. This grip is for heavier markings.
2.) Underhand grip: With this position, you are gripping the pencil with your thumb as it lays in the between the index and middle finger. The pencil point is again, is on its side as it strikes the paper. The strokes are made with the motion of the arm. I find this grip awkward and uncomfortable.
3.) The “writers” grip: The most commonly used and with this position, you hold the pencil as you would write. The pencil is gripped with the forefinger and thumb while the shaft rests between those two fingers. The pencil point can be on its side and directly on the point as it strikes the paper. The strokes can be made with the motion of the wrist as well as the arm. This position is the most common because it gives the artist more control and precision.
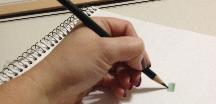
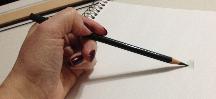
If you position you hand closer to the end of the shaft, you have more control and precision, but heavier strokes (darker markings). The further up the shaft you place your grip gives you less control and precision, but lighter stroke (lighter markings).
Colored Pencil Points


A sharp pencil point when applied, saturates color through the texture of the paper. Sharpening your pencil often, usually every minute or so, will keep work precise as well as saturated with color.
A blunt pencil point when applied, allows the texture of the paper showing through. You will be able to see specks of the paper through the pencil.
Colored Pencil Pressure

Colored pencil is a translucent medium. by changing the pressure on your pencil, you can make three varying degrees of color
Light – tints the paper
Medium – excellent for layering
Heavy – flatten the paper tooth
Colored Pencil Strokes
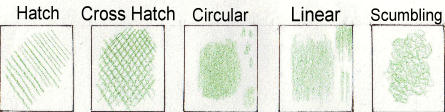
1.) Hatching – Are lines parallel to each other whether vertical or horizontal. Can be different weights of lines, unevenly spaced and the changing of colors.
2.) Cross hatching – Is the same as hatching but the lines cross over each other in different directions.
3.) Circular– The stroke is more oblong than circular and the most commonly used. These overlapping circular strokes are the easiest way to achieve even color. Keep your oblong small and your pencil points sharp.
4.) Linear – Layer in one direction, keeping lines close together. Stagger the line length or you will have bars of uneven color. Make sure that pencil point is sharp.
5.) Scumbling – “brillo pad” interlocking squiggles. This stroke is uneven and creates interesting textures.
In this weeks lesson you will need to draw a series of squares of different sizes and fill them with different colored pencil strokes using different points as well as pressures. Practice makes perfect so draw plenty!
Until next week….
Be Well and Happy!


2 thoughts on “Techniques Part 1”