When we buy a colored pencil technique book, we expect great things. This book will answer all our questions, solve all of our issues and by the end we WILL be as good (if not better) than the author. Then we go through book, screw up a few traced exercises then curse, scream and set the book on fire! Well, no… not really but if you have worked with the demos, you have wanted to. I have learned some great tricks in colored pencil, but what I am saying is that you should not the last half of these books to teach you how to paint in colored pencil. Teach yourself.
Let me go on record saying, “I love my colored pencil books and don’t see them as a waste of money. But authors have been painting for years and years before they had their very own book published. Those exercises are just too difficult for the novice.”
It took a long time for me to figure out that in trying to paint those demos, what I was actually doing was trying to replicate the “style” of the artist. I was learning nothing, and if by chance I did complete a demo, I could not paint another using my own reference. I don’t know about you but I’m not a protégé of one the old masters. I don’t want to waste time studying their style of art to crank out pieces…or not able to crank out anything.
Out of all the mediums, colored pencil is the most difficult to manipulate because it is pushed to the very boundaries of its capability. Colored pencil is not an easy medium to learn, but with a little planning you can be more confident in your endeavor.
Do you remember when you were in high school and the Geography teacher made you draw and color key maps? You know, color green, the region whose cash crop is peas and make the lakes blue…yada yada yada…..Painting in color pencil is similar to those maps, but only more intricate.
I am going to assume that you can draw a little bit, but even if you can’t this exercise should be fairly easy.
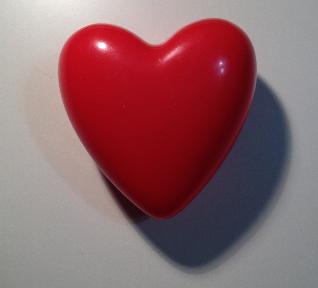
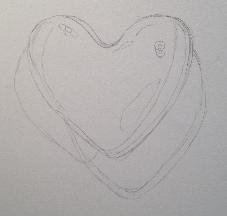
Below is a plastic heart that I found in my daughter’s room. I chose this subject because it simple in design, it is bright but only has few colors. It will also be your reference and your only demo (ish) in the series.

Drawing
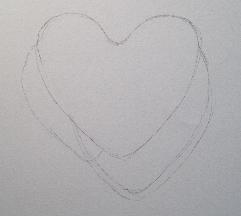
As you can see, this line drawing is a little messy. I have a couple of smudges and eraser marks. These mars would be fine if I were drawing. But in colored pencil, the pencil marks would show up through the wax pencil and impossible to erase. You can solve this by transferring your drawing on clean paper and in a few different ways using: a projector, light box, graphite paper, or simply taping your drawing to a window (during full sun) with a clean paper overlay. Use very light strokes just dark enough for you to see where the color goes. An even better solution is to use the basic color of your reference to outline the drawing (red heart=red or pink pencil)
****Just to be safe, always transfer your drawing!
Mapping Color

Mapping color is when separate the different colors and/or color changes in your drawing. As your color changes within the same object you would use the graduation method using circular strokes in light layers to block in color. The more thorough you are in mapping out color the more realistic your art will be.
Above is the drawing with my colors mapped out. The picture on the right is the same as the left but drawn in ink to make the heart more visible.
Color Choice Legend
From the numbered drawing above on right
1.) This indicates where my light source is coming from (top left almost center) and is called the highlight. The highlight is the lightest part of the painting because that is where the light is concentrated. Some artists go from painting the light colors first and the darks last, and others do the opposite. Just paint what you feel confident with, but remember lighter mistakes are easier to erase.
2.) Is a darker value of base color. The object is on a curve and it isn’t receiving as much light The lack of light causes a shadow because the light has move around the object.
3.) Is the graduation of the darker base color and in to the overall color you choose for the heart.
4.) Is the reflected light and it indicates the shape of the object as the light curves around that area.
5.) Is a shadow.
6.)It’s the shadow’s edge. Is a lighter hued shadow, but still a shadow
7.) Is the cast shadow and is the darkest area of the drawing.
8.) The light can reach further around the object but is still casting a light shadow of the true color of the heart.
***Whatever isn’t labeled, is the true overall color of your heart.
Blocking In Color
Blocking in color is the laying down of color in a very light layer indicating where you want the colors to go. For example: I would paint in the shadow using a very light cloud blue or a gray to indicate where my shadow would go. And after I mixed my red, I would use the lightest hue for the overall heart, and the darkest hue for the heart’s shadow. I would save the highlights for last so I could burnish into the very white of the highlight.
This Weeks Lesson:
Draw this heart. Don’t draw the heart too big or too small. If drawn too big, you will spend too much time on this and if you mess up, you will be too frustrated to try it again. If drawn to small, you have a hard time navigating your way through will result in more frustration.
Then, after all of this and you are still wanting more? Mix color chips and use the one and two color graduation.
Other Lessons:
Color Wheel and Color Theory
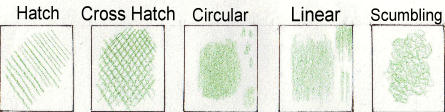
Techniques 1
Techniques 2
Mixing Colors
Enjoy!
Be Well and Happy!